Top 3 Tips for Installing Bathroom Grab Bars
When installing bathroom grab bars, I focus on three key tips for ideal safety and convenience. First, choose the right location by placing bars near the shower, bathtub, and toilet, ensuring they’re at a comfortable height. Second, select appropriate grab bars, opting for rust-resistant materials like stainless steel, at least 18 inches long, with a textured surface for a better grip. Finally, make sure the installation is secure by anchoring bars to wall studs with rust-resistant screws and using a drill bit that matches the screws for a snug fit. There’s more to learn for creating a safer bathroom environment.
For a comprehensive guide on adapting your home for long-term comfort and safety, check out our article on aging in place home modification ideas.
(Note: Grab bars are also referred to as handrails, support bars, assist bars, safety rails, stability bars, support rails, hold bars, or grip bars. Throughout this article, we’ll use these terms interchangeably.)
Tips for Installing Bathroom Grab Bars Table of Content Links
Article Video Summary
Listen to a Summary of the Top 3 Tips for Installing Bathroom Grab Bars
Click the play button below to learn more:
Key Takeaways
- Identify wall studs for secure anchoring of handrails.
- Use rust-resistant screws and anchors specifically designed for support bars to ensure durability.
- Install assist bars at a comfortable height and angle for easy accessibility.
- Choose textured, stainless steel safety rails for grip and rust resistance.
- Drill pilot holes to prevent wall damage and ensure smooth screw installation.
- Consider ADA guidelines for proper stability bars placement and height.
- Assess the specific needs of the user, including mobility issues and weight capacity requirements.
Choose the Right Location
When installing bathroom support rails, it’s vital to choose the right location to guarantee maximum safety and accessibility. I always start by evaluating the spots where slips and falls are most likely to happen.
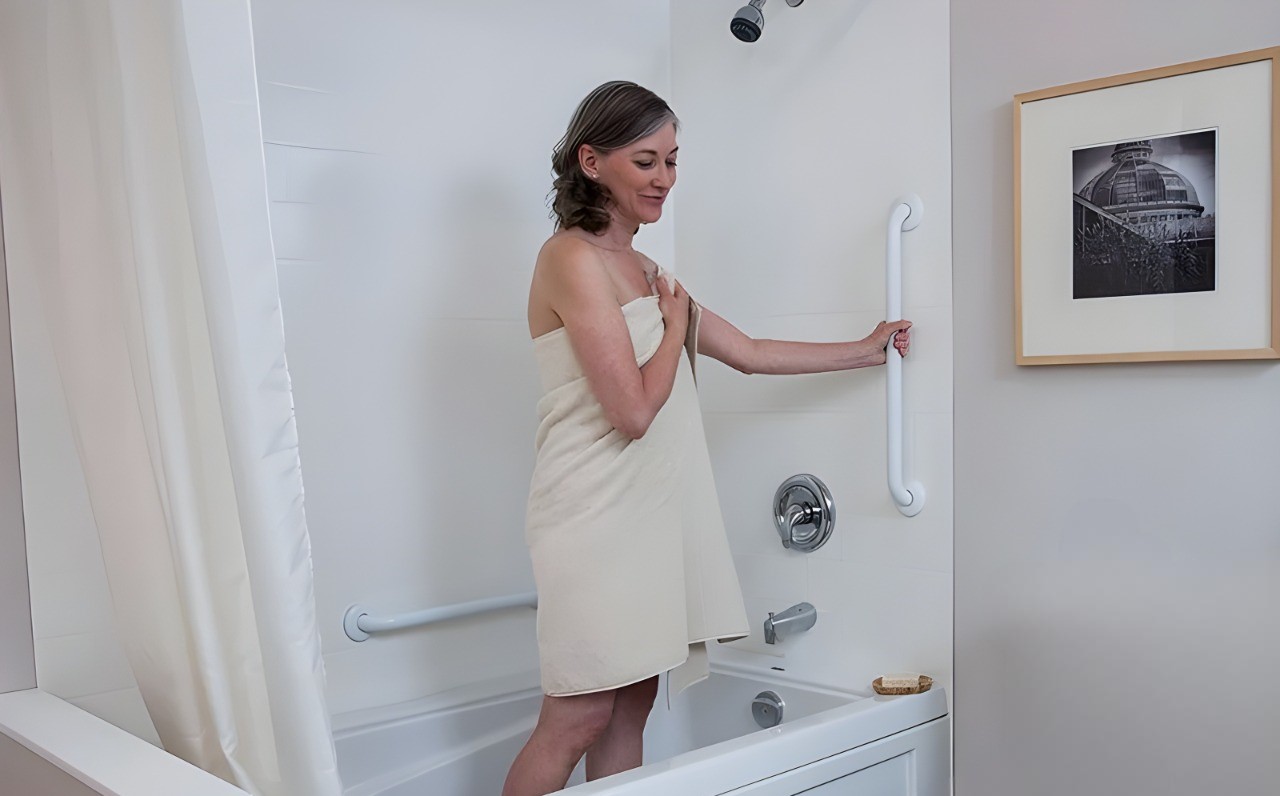
The first place I consider is near the shower or bathtub, as these areas are often slippery. A hold bar here can provide support while stepping in and out. Given that falls are a leading cause of injury among seniors, this modification can greatly reduce risk.
Next, I look at the area around the toilet. Installing a grip bar beside the toilet can help with sitting down and standing up. I make sure it’s within easy reach and at a height that offers ideal leverage.
Entry points into the bathroom can also benefit from handrails. Sometimes, just having that extra support when crossing the threshold can make a big difference, especially for those with mobility issues. I verify the support bars are installed at a comfortable height and angle.
When considering placement, I always keep in mind the ADA guidelines, which recommend assist bars be installed 33-36 inches above the floor. However, I also assess the specific needs of the user. For wheelchair users, I might adjust the height slightly lower, while for taller individuals or those with particular balance issues, I might install them a bit higher.
Lastly, I think about the overall layout of the bathroom. It’s important to place safety rails where they won’t obstruct movement but will still be accessible when needed. I also consider combining stability bars with other safety features like non-slip mats or raised toilet seats for comprehensive bathroom safety. By carefully choosing the right locations, I can create a safer and more accessible bathroom space.
Select Appropriate Grab Bars
After pinpointing the ideal locations for grab bars, the next step is to select the appropriate ones that will provide the best support and durability. With so many options available, it’s vital to choose grab bars that match your specific needs while guaranteeing safety and reliability.
For example, understanding the importance of proper tools can greatly aid in the installation process.
When selecting appropriate grab bars, I always consider the following factors:
Key Considerations for Selecting Support Rails
| Factor | Recommendation |
|---|---|
| Material | Stainless steel (rust-resistant) |
| Length | At least 18 inches |
| Weight Capacity | Minimum 250 pounds |
| Texture | Textured surface for better grip |
| Type | Straight, L-shaped, or angled based on needs |
| Aesthetics | Various finishes to complement bathroom decor |
| Diameter | Ensuring a secure and comfortable grip |
By keeping these factors in mind, you can ensure that you choose assist bars that not only meet safety requirements but also suit your specific needs and bathroom design. Remember, the right safety rails can make a significant difference in bathroom safety and accessibility.
I find that taking these factors into account helps me choose support rails that will improve safety in the bathroom.
Selecting the right hold bars is a vital step to guarantee they function as intended and provide the support needed for anyone using them.
Ensure Secure Installation
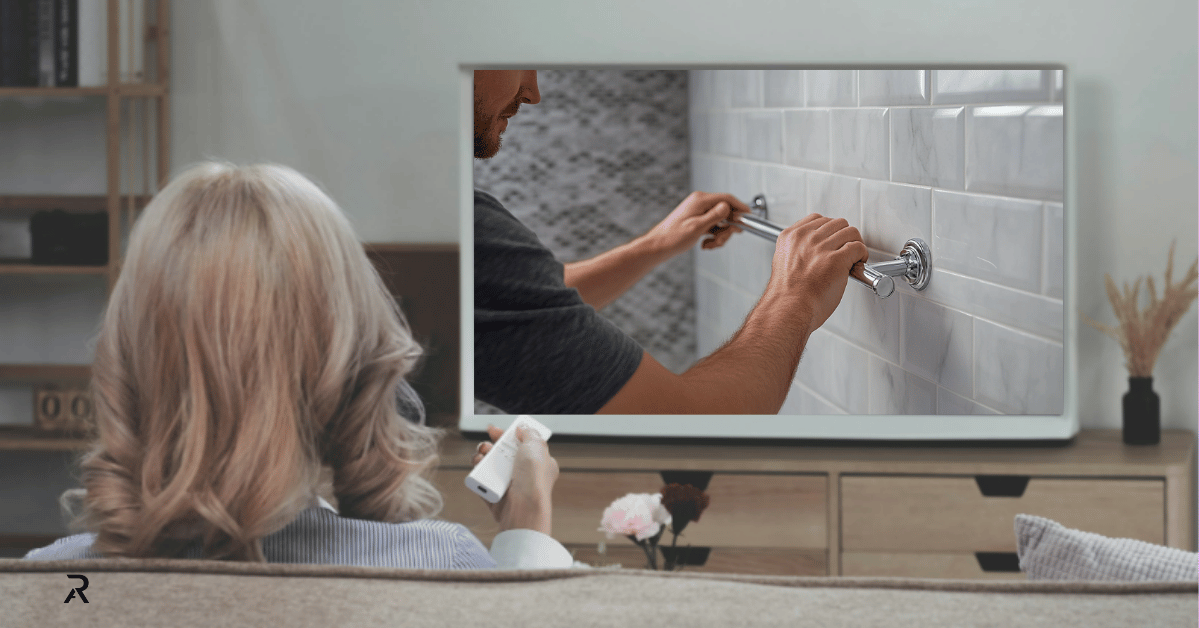
Guaranteeing a secure installation is needed to confirm that the grip bars provide the necessary support and safety. First, I always make certain to locate the wall studs using a stud finder. Studs offer the solid backing needed to anchor the handrails securely. Marking the exact spots for drilling is imperative, so I double-check measurements to verify alignment with the studs.
It’s also helpful to refer to housing production policies that guarantee safety compliance in construction standards.
Next, I use high-quality, rust-resistant screws and anchors specifically designed for support bars. These components are significant because they must withstand considerable weight and moisture exposure. I prefer stainless steel screws, as they offer both durability and resistance to corrosion.
Then, I drill pilot holes at the marked spots. This step is needed to prevent the wall from cracking and to confirm the screws go in smoothly. I make certain the drill bit matches the size of the screws for a snug fit.
Once the pilot holes are ready, I align the assist bar and carefully drive in each screw, verifying they’re tight and secure.
After installation, I always perform a stability test. I apply significant pressure to the safety rail from multiple angles to ensure it can withstand the force it might encounter during use. This step is needed for safety and gives me confidence in the installation.
It’s important to note that the installation process may vary depending on the wall type. For tiled walls, I use a diamond drill bit to prevent cracking, and for concrete walls, I employ masonry anchors for added security.
Final Thoughts
Installing bathroom grab bars isn’t just about safety but peace of mind. Choosing the right location guarantees accessibility, while selecting appropriate grab bars assures durability.
The secure installation transforms a simple bar into a lifesaving tool. By taking these steps, you’re not just adding hardware; you’re creating a sanctuary of security.
Don’t wait until an accident happens – invest in safety rails today and create a safer, more accessible living environment for yourself and your loved ones.
People Also Ask (PAA)
Can I install grab bars over existing bathroom fixtures like towel racks or soap dishes?
It’s not recommended. Grab bars need to be anchored directly to wall studs for maximum safety. Remove existing fixtures first, then install grab bars in the most appropriate locations.
Item Are there any grab bar options for people who rent their homes and can't make permanent modifications?
Yes, there are tension-mounted grab bars and portable suction cup grab bars. While not as secure as permanently installed bars, these can provide temporary support. Always check with your landlord first and use caution.
Item How often should I replace my bathroom grab bars?
With proper installation and maintenance, grab bars can last many years. However, you should replace them if you notice any signs of corrosion, loosening, or damage to the bar or surrounding wall. It’s a good idea to inspect them annually.