Cutting Into Drywall: Don’t Damage Wires or Pipes Behind Walls
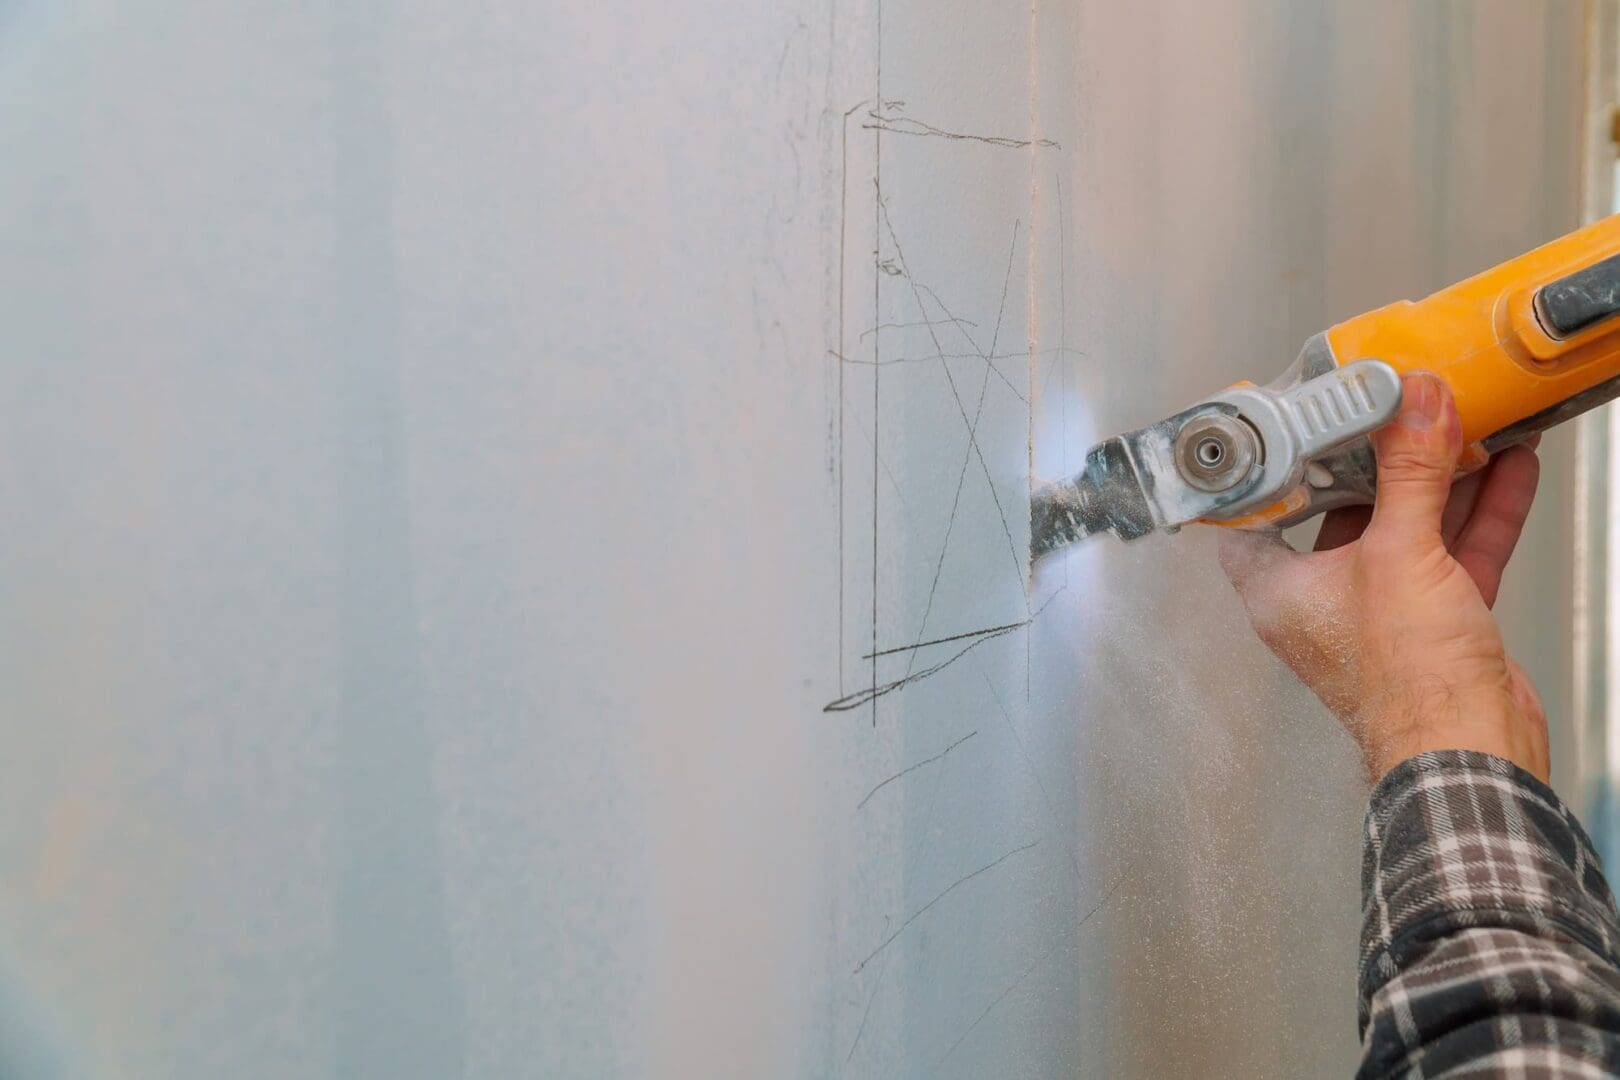 Cutting plasterboard plaster drywall hand with electro saw
Before cutting into drywall, it is crucial to ensure that you have a thorough understanding of what lies behind it. This will help avoid damaging electrical wires, plumbing pipes, or other vital structural components. Here are the steps before cutting into drywall:
1. Locate a suitable area: Before making any cuts, determine where to access behind the drywall. This could be for installing a new outlet, cutting out an area for in-wall storage shelves, running new wiring, or inspecting pipes.
2. Ensure there are no hidden obstructions: Before cutting, it is essential to check for any hidden obstructions behind the wall. Use a wire detector or pipe locator to scan the area and ensure no electrical wires or plumbing pipes are near the cut. This step is crucial for your safety and to prevent damage to the existing infrastructure.
Adhering to these guidelines minimizes the risk of damaging essential components and confidently approaches any project involving cutting into drywall. Always prioritize safety and take the necessary precautions before proceeding with construction or renovation work.
Key Takeaways
– Use a stud finder or alternative methods to locate safe cutting areas before cutting into drywall.
– Consider potential obstructions like electrical outlets, switches, pipes, or vents on the other side of the wall.
– Carefully consider the placement of electrical outlets and light switches to avoid damaging wiring and ensure proper functioning.
– Gather valuable information by tapping the wall or using small finishing nails to locate studs before cutting into drywall.
Find A Location
When attempting to locate a suitable spot for cutting into drywall, several key points must be considered.
First, it is important to check the other side of the wall to determine any obstructions or potential hazards.
Additionally, a stud finder can help identify the presence of studs, which can serve as a guide for cutting.
If a stud finder is unavailable, other methods, such as checking electrical outlets, light switches, or plumbing fixture locations, can help determine a suitable cutting location.
Find Where The Wall Studs Are Located
The first thing that needs to be done in selecting a location is determining where the wall studs are located. This will strongly influence where you will cut the wall. Because wall studs are hidden behind drywall, they can be challenging to find.
As discussed below, there are several ways to find where the wall studs are located.

Use A Stud Finder
A stud finder will help locate wood studs inside a wall.
Hold the stud finder against the wall firmly. The stud finder must make good contact with the wall to work correctly.
Move the stud finder slowly across the wall. The stud finder will beep or light up when it detects a stud.
You can try different settings on the stud finder. Some stud finders have different settings that can be used to find studs in different types of walls.
Use A Knuckle Or A Closed Fist To Tap The Wall
Use a knuckle or a closed fist to thump or knock on the wall in the area where you want to cut the wall. Listen for a change in sound as you move across the wall (horizontally).
If you are over a stud, the sound will be a “solid low-pitched” sound compared to a “hollow high-pitched” sound when no stud is behind the wall.
Visually And Physically Inspect The Wall
When you visually and physically inspect the wall, you often see signs of where a stud might be, especially in an older home.
Signs of drywall nails popping up slightly, drywall tape showing, or a “bump out” of the drywall are all good signs where a stud may be located.
Look for outlets or switches on the wall you want to cut since these are normally attached to a stud during the original construction. To verify if it is attached to a stud, take the front plate off; then, the box can be inspected to determine if it is a new or old work electrical box. If it is the new work electrical, it should be attached to a stud by nails.
If it is an old work electrical box, it could be anywhere in the wall between two studs, including next to a wall stud.
Measure From A Known Stud Location
Most interior wall studs are located 16 inches on-center. If there is a known wall stud along the wall you are interested in cutting into, measure 16 inches from that wall stud. This will be the approximate location of a wall stud. If that was not the location needed, continue measuring 16 inches from a known wall stud to find the next wall stud.

Use A Strong Magnet To Locate Nails
However, it is important to note that not all nails used to attach drywall to studs are made of steel. Some nails are made of plastic or other non-magnetic materials. So, if you use a magnet to find a wall stud, it is possible that you will not find a magnet if the nails are not made of steel.
In addition to using a plain magnet, magnetic stud finders have magnets embedded in them so no batteries are required.
Here are some tips for using a magnet to find a wall stud:
- Use a strong magnet. A stronger magnet will be more likely to detect the steel nails. Something like a neodymium magnet would be best.
- Move the magnet slowly over the wall. This will help you to pinpoint the location of the stud.
- Check for other magnetic objects. Other magnetic objects, such as screws or metal brackets, maybe in the wall.
Finishing Nail Hack To Find Wall Studs
Consider using a small, short-finishing nail to confirm a stud at your location.
You might need to do some minor drywall repair after you are done, but with such a small hole spackling and some touch-up paint normally hides where the hole was made.
Most homes use the 16-inch on-center interior walls. The most common thickness of drywall used for this configuration is ½ inch drywall. While not every home uses this standard, it is a good place to start.
Gently tap on the finishing nail using a small hammer, preferably a rubber mallet, until it hits something solid (the stud) or goes freely into the drywall – DO NOT hammer the nail in past ½ inch to prevent hitting any obstruction behind the wall. This will prevent accidentally damaging a live electrical wire, a water pipe, or other obstruction.
Visually Check The Other Side Of The Wall
A quick check for a potential obstacle is checking the other side of the wall where you want to cut the drywall hole. This will provide the quickest indicator that you may need to choose another location.
Potential obstacles include existing wall plugs and light switches. Both should have an electrical outlet box associated with them, and the box would protrude somewhere between 1½ inches and 3 inches inside the wall. There would be electrical wires connected to the outlets that would need to be considered.
There might be outlets containing video or audio cables (e.g., speaker cables, coax cables, or HDMI cables), indicating there might be wires behind the area you want to cut.
There could be an existing hole on the other side for in-wall shelving.
A picture may be hanging on the other side of the wall supported by wall anchors, which would protrude into the area you want to cut.
A plumbing fixture on the other side of the wall would indicate a possibility of plumbing water or drainage pipes.
An air vent (e.g., a return air vent for a gas heater) could become an issue. Some air vents use the opening between the walls to allow for the flow of air. It is crucial that you do not block this flow of air. If you were considering installing an in-wall shelf, this would potentially block the flow of the air.
Visually Check Any Room Above or Below the Cut Area
If you see plumbing fixtures (e.g., a sink), pipes may run in the wall.
If you see any outlets (e.g., electrical or low voltage), wires may run in the wall.
If the room where the cut is to be made is above a utility room, there may be a plumbing air vent pipe or an exhaust vent for a gas heater.
If there is an electrical box behind the area you want to cut, either move the location of the cut or move the outlet box to another location.
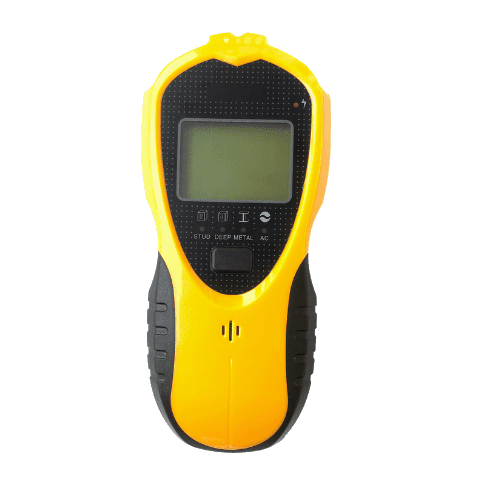
Use a Wall Scanner To Find Pipes and Wires
Even if a visual inspection does not indicate any obstacle behind the area you want to cut, doesn’t mean the area behind the cut is free of obstructions.
Some tools can identify wall studs, metal, copper, and live electrical wires. These tools are wall scanners and are a relatively safe tool. However, following the manufacturer’s instructions carefully is important to avoid injury.
Guessing what is behind the wall is a recipe for disaster. Cutting into a live wire could be fatal. Cutting into copper tubing could cause a water disaster.
Here are some tips that increase your chances of detecting any objects behind the wall: scanner:
- Hold the scanner against the wall firmly. The scanner needs to make good contact with the wall in order to work properly.
- Move the scanner slowly across the wall. The scanner will beep or light up when it detects an object.
- Try different settings on the scanner. Some scanners have different settings that can be used to find objects in different types of walls.
Will a wall scanner detect anything and everything behind a wall – NO! But you are getting a good indication of what might be behind the wall.
Before cutting the drywall, you should try to see if anything is behind the wall. Even if everything you have done indicates it is free of obstacles.
Be Aware of Other Hazards
Another critical factor to consider is the many potential hazards beyond the scope of electrical and plumbing systems, posing significant risks and potentially catastrophic consequences if not properly addressed. These hazards include:
- Structural Integrity: Cutting into drywall without knowledge of the wall’s load-bearing capacity can lead to structural collapse.
- Mold and Mildew: Moisture trapped behind the drywall can create an ideal environment for the growth of mold and mildew, which can cause respiratory issues.
- Asbestos and Lead Paint: Older homes may have hidden asbestos or lead paint, which can be released into the air during renovation, posing serious health risks.
Understanding these hazards is crucial before proceeding and making your cut into the drywall.
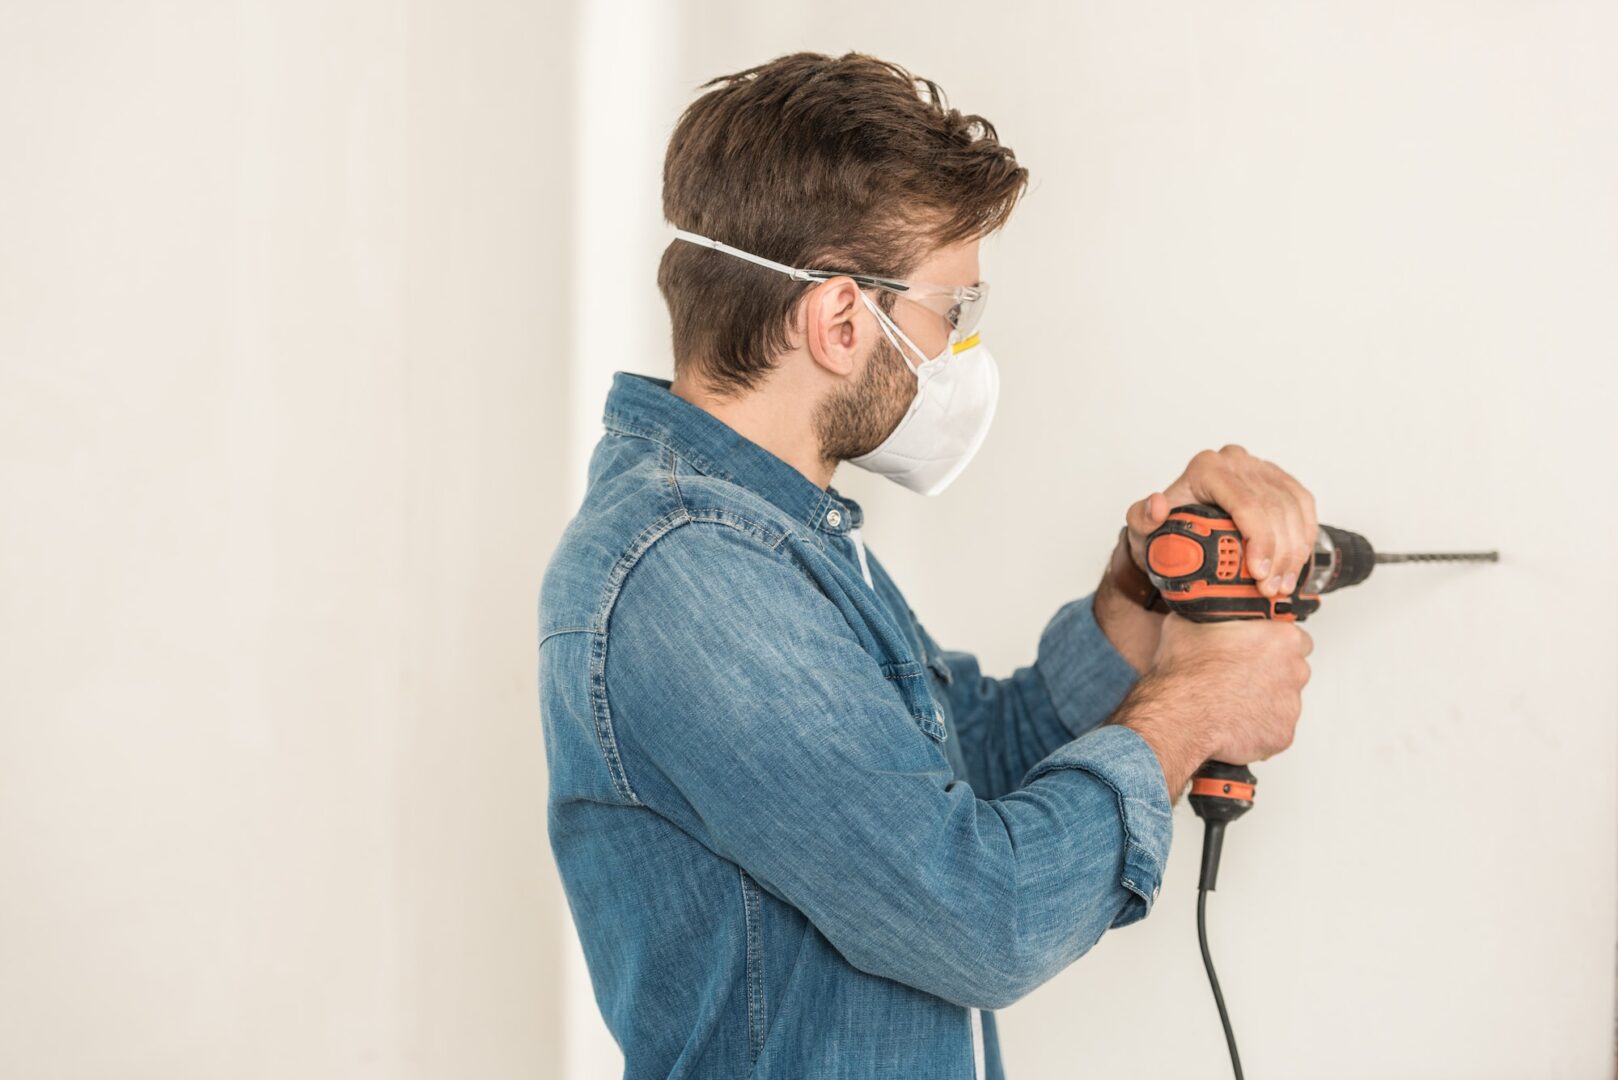
Cut or Drill a Small Hole
Do not proceed with this step if you detect or are concerned about the presence of mold, mildew, asbestos, or lead paint.
Even if you are convinced there are no objects behind the area you want to cut, you should always cut or drill a small test hole so you can visually inspect inside the wall.
This can be approached in several ways. If you have a device that can see inside walls (e.g., endoscope or borescope), cut or drill as small a hole as possible to make it easy to patch if you detect obstacles.

Make sure the hole just barely breaks the surface of the wall. If you are using a drill, use a drill bit stop collar to ensure the bit will just break the wall’s surface. Insert the device into the hole to inspect the behind the potential cut area.
You can also use a keyhole saw or a utility knife to cut a small hole in your wall.
Keyhole saws are a relatively easy tool to use. To use a keyhole saw, you first need to insert the blade into the material where you want to cut the hole. Then, you need to turn the saw blade while applying pressure. The saw blade will cut a hole in the wall.
A utility knife can also be used to cut a hole in the wall.
A utility knife, also known as a box cutter or a carpet knife, is a small, handheld knife with a replaceable blade. It is used for a variety of tasks such as cutting drywall. They are a relatively easy tool to use, but it is important to be careful not to cut yourself or to cut too deep.
If there is no device available to look into the wall, cut the hole big enough to use a flashlight (e.g., a small pen-type flashlight) and visually inspect the area.
Ready To Cut The Drywall
Once the above steps are completed, the wall studs identified, and the area behind the wall is free from obstructions the hole can be cut.
If there are any doubts, it might be time to seek help.
Seek Professional Help If In Doubt
If you have any doubts about your ability to find a stud or determine if there are any hidden objects behind the area to be cut, consult with a professional.
Seeking professional help from a qualified contractor or inspector can help ensure that the proper steps are taken to avoid any unnecessary damage or risks.
Additionally, professionals have the knowledge and expertise to identify potential problems that may not be apparent to the untrained eye.
By consulting with a professional, you can better understand the situation and make informed decisions about the next steps in your project.
Terms and Definitions Used in This Article
Boroscope
A boroscope is an optical instrument designed to assist visual inspection of narrow, difficult-to-reach cavities, consisting of a rigid or flexible tube with an eyepiece or display on one end and an objective lens or camera on the other.
The boroscope is generally used for mechanical objects such as inspecting inside small openings (behind drywall).
Bump-out
When framing a room, the studs are the vertical pieces of wood to which the drywall is attached. The studs are usually spaced 16 inches apart and should be flush against the back of the wall.
Sometimes the studs are not flush against the back of the wall, causing a slight bump that can often be visually seen or felt when you run your hand across the wall.
Endoscope
An endoscope is a long, flexible tube with a camera and light source at one end. The other end of the tube is inserted into a wall, and the camera sends images to a monitor. Typically used in the medical field for examining a small cavity or organ, but it can be used to inspect inside a wall.
Keyhole Saw
A keyhole saw, also known as a compass or a hole saw, is used to cut small, curved holes in wood, metal, or other materials. It has a thin, narrow blade with a hole in the center. The hole in the center allows the saw to be inserted into the material and the blade to be turned without binding.
Magnetic Stud Finder
A magnetic stud finder is a tool used to locate wall studs by detecting the magnetic field of steel nails or screws that are typically used to attach drywall to the studs.
Magnetic stud finders are typically small, handheld devices with a magnetized tip. When the tip of the magnetizer is moved over a wall, it will be attracted to the steel nails or screws if a stud is behind the wall.
The magnetic stud finder typically has a built-in indicator that will light up or beep when it detects a stud. Some magnetic stud finders also have a dial that can be used to adjust the sensitivity of the magnetizer.
Magnetic stud finders are a relatively inexpensive and easy-to-use tool. However, they are less accurate than other types of stud finders, such as electronic ones.
New Work Electrical Boxes
New work electrical boxes are used to house electrical wiring and devices during construction. They are typically made of metal or plastic and installed in the wall before the drywall is installed.
They are generally nailed to a wall stud.
Neodymium Magnet
Neodymium magnets are the strongest type of permanent magnet available. They are made of neodymium, iron, and boron and can be very powerful.
These magnets are the strongest type of permanent magnet currently available.
They are small, portable, and they are affordable.
Old Work Electrical Boxes
Old work electrical boxes are used to replace or add electrical wiring and devices in walls that already have drywall. They are typically made of metal or plastic and have a knockout feature that allows them to be cut to fit the size of the electrical wiring and devices.
These may not be attached or even near a wall stud.
On-center
Studs are the vertical pieces of wood that the drywall is attached to. The studs are usually spaced 16 inches apart, meaning there is a 16-inch space between the center of each stud.
16 inches is used because the standard drywall size allows the ends/sides to be attached to a stud. You do not want the ends/sides of drywall to float over an empty area – they must be attached to a stud.
You use the center of the stud to measure so the drywall covers half of the stud, and the next sheet of drywall will cover the other half of the stud. Now, both pieces of drywall can be nailed to the stud.
Rubber mallet
A rubber mallet is a type of hammer with a rubber head. It is used for tasks that require a softer blow than a regular hammer would provide.
Spackling
Spackling is putty used to fill in small holes, cracks, and imperfections in drywall. It is a smooth, white paste made from gypsum powder and binders.
Stud Finder
A stud finder is a compact, handheld tool designed to detect wood studs behind walls using either sound waves or electricity.
Sound wave stud finders work by emitting sound waves and listening for echoes that bounce back when they hit a stud, while electric stud finders gauge differences in electrical resistance between the stud and drywall.
Once a stud is identified, the device alerts the user with a beep or light indicator.
For effective use, it’s crucial to hold the stud finder firmly against the wall ensuring good contact, move it slowly for accurate detection, and experiment with different settings.
Utility Knife
A utility knife, also known as a box cutter or a carpet knife, is a small, handheld knife with a replaceable blade.
Utility knives typically have a metal handle with a spring-loaded mechanism that pushes out a new blade when the old blade is used up. The blades are typically carbon steel or stainless steel and are available in various shapes and sizes.
Wall Scanner
A wall scanner is a handheld tool designed to detect hidden objects in walls using sound waves, electricity, or other technologies.
There are two primary types: sound wave scanners, which emit sound waves and determine the object’s location by the echo produced, and electrical scanners, which send a small electric current and identify objects based on differences in electrical resistance.
Once detected, the scanner will signal the user with a beep or light. These devices are invaluable for safely hanging pictures or shelves by locating studs, ensuring no pipes are accidentally struck when drilling, detecting electrical wires to prevent electrocution, and identifying other objects like nails, and screws.
Wall Stud
A wall stud in a residential building is typically a long thin piece of wood used to build inside walls. For interior walls, the stud is commonly a 2” X 4” (commonly pronounced as a two by four) piece of wood of varying lengths. The wood dimensions are not actually 2” X 4” for the finished stud, it is actually 1.5 inches by 3.5 inches.
The term two by four is a holdover from the days when lumber was not planed. The rough cut was 2 inches by 4 inches. Today, it is planed so all imperfections are removed, and the final cut is 1.5 by 3.5 inches.
The term two by four is used throughout the construction industry.
There are also other sizes of wall studs used in construction. For example, on an outside wall, the dimensions may be two by six. The wider side is used for additional strength and allows more insulation room.
The wood normally used is pine or fir.
Wooden studs can be used to create the frame of a wall. The frame is made up of two rows of studs that are spaced 16 inches apart. The drywall is then attached to the frame. The studs support the drywall and help keep the wall strong.
Wall studs can also be metal. While metal studs are usually in commercial buildings, there is always a possibility a residential home/building could have metal studs.
Conclusion
Before cutting into drywall, it is important to choose the location carefully. Once the location is determined, preparing oneself for the task is crucial. This includes gathering the necessary tools and taking safety precautions.
Ensuring that nothing behind the wall could be damaged during the cutting process is also essential.
By following these steps, one can successfully cut into drywall without any issues.
In conclusion, cutting into drywall requires careful planning and preparation to avoid any potential damage. One interesting statistic is that according to a National Association of Home Builders study, drywall is the most commonly used interior wall material in residential construction, accounting for approximately 90% of all interior walls. This highlights the importance of properly cutting into drywall without causing any harm.
Frequently Asked Questions
Q: What is the difference between a stud finder and a wall scanner?
A: A stud finder and a wall scanner are both tools that can be used to locate hidden objects in walls. However, there are some key differences between the two tools.
- Stud finders are specifically designed to locate wood studs in walls. They use sound waves or electricity to locate the studs, and they typically have a range of up to 16 inches.
- Wall scanners are more versatile than stud finders. They can be used to locate a wider variety of objects, including studs, pipes, electrical wires, and other objects. Wall scanners typically use sound waves or electricity to locate objects, but they may also use other technologies, such as radar or thermal imaging.
In addition to their capabilities, stud finders, and wall scanners differ in size and price. Stud finders are typically smaller and less expensive than wall scanners.